Sizzling steaks, cozy homes, and polymerase chain reaction (PCR) thermocycles share a common need: they must be at the right temperature. Once we had programmed our Xiaomi Mi Smart 3.5 L air fryer to perform PCR-like thermocycling, achieving our aim of running a PCR in an air fryer meant we had to achieve the right thermal conditions for the PCR cycle. That is why we have been using the term ‘PCR-like’ conditions, but not true PCR thermocycles.
We programmed our air fryer to cycle the 3 thermal steps of PCR: 45 seconds at 94°C, 60 seconds at 55°C, 30 seconds at 72°C. In fact, all these temperatures were our target temperatures. The target temperature is the thermal goal for the air fryer to reach, if it runs long enough. However, the target may differ from the internal temperature of an air fryer. After all, air fryers are neither designed to run seconds-long programs nor to combine different temperature programs as steps. Short durations between steps may cause inconsistent internal heating or cooling down or not allow enough time for the internal temperature to stabilize in the air fryer. Does the air fryer even have the precision to run PCR-like thermocycles, if it was mainly designed to prepare chicken wings?
Upon acknowledging that the internal and target temperatures of our air fryer might have differed, there was no other way but to make peace with these caveats and the limitations of optimizing air fryer PCR conditions. This acknowledgement was the moment of truth, because it meant that our €52 air fryer alone was not enough to perform a PCR. We needed another tool to measure the internal temperature and, preferably, use it as a live input in the PCR programs to improve our control over the air fryer’s internal temperature. Thus, we turned our eyes toward smart home appliances once again to find ‘the tool’ that we could use for measuring and manipulating the temperatures of the air fryer.
The search begins…
The tool that we needed had several prerequisites: a) it needed to be smart, meaning compatible with our Home Assistant server; b) it must be able to transfer measurements from within the metal chamber of the air fryer; c) it must endure at least 10% more than the highest temperature in our thermocycle: 94°C + 9.4°C = 104.4°C; d) it should be possible to calibrate it; e) it should be relatively cheap; and f) it should be able to provide us with raw temperature measurement data for downstream analysis, if necessary. As a result of our market research, wespotted that some home thermometers and grill thermometers fulfilled at least some of our criteria. However, only the smart home thermometer IBS-TH2+ fulfilled all of them, as we could integrate it into the Home Assistant server, and it could transfer the measurements from the air fryer’s aluminum chamber via its probe. Here is our comparison table:
| Table 1. Smart home thermometer comparison. Red text: options that did not meet our criteria. Green text: option that met all criteria. | ||||||
|---|---|---|---|---|---|---|
|
Product |
Purpose |
Smart Software |
Signalling |
Tmax °C |
Calibration |
Price (€) |
|
IBT-24S |
Grill |
Theengs |
Probe, Bluetooth |
250 |
Yes |
65 |
|
IBBQ-4B |
Grill |
Tuya |
Probe, Bluetooth, WiFi |
250 |
Yes |
84 |
|
IBT-4XS |
Grill |
Shelly |
Probe, Bluetooth |
250 |
Yes |
59 |
|
IBS-TH2 |
Home |
Home Assistant |
Bluetooth |
125 |
Yes |
17 |
|
IBS-TH2+ |
Home |
Home Assistant |
Probe, Bluetooth |
125 |
Yes |
25 |
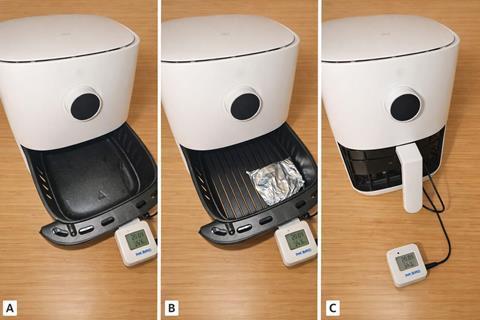
Upon the arrival of the home thermometer, we connected its probe and inserted it into the air fryer (Fig. 1). To ensure an accurate thermal reading from the probe, we covered the grill of the air fryer with aluminum foil to protect the probe from the air blast of the air fryer’s fan.
Set-up and setbacks
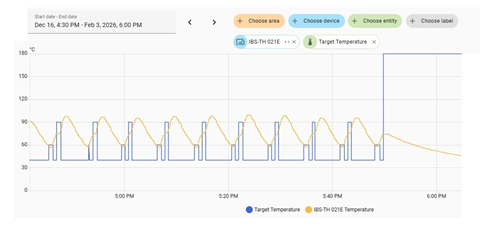
Following the completion of our experimental setup, we decided to use it to measure the internal temperature of the air fryer, using the protocol of our initial air fryer thermocycles that we showed in our first article: a 94°C denaturation step for 45 seconds, a 55°C annealing step for 60 seconds, and a 72°C elongation step for 30 seconds. In our first run, observing the PCR-like target temperature thermal curves in the Home Assistant interface was a major achievement. However, the new results, after the integration of the home thermometer into our system, sank our initial achievement to the bottom of the sea. We observed that a) the air fryer overshot the temperature of 94°C in each cycle; b) it never cooled down to the annealing temperature of 55°C, and c) the elongation step temperature never remained constant at 72°C (Fig. 2).
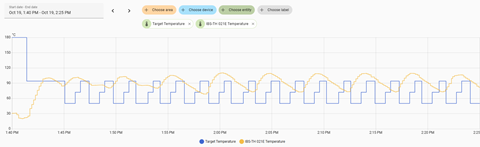
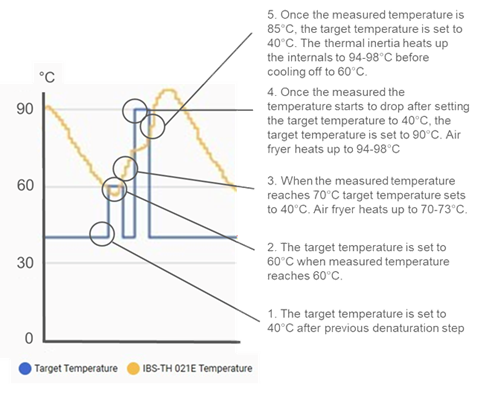
Observing the inside temperature while we were performing our regular thermocycle protocol revealed a failure, but was also illustrative of how to improve our protocol. The trick was to set different target temperatures from the internal temperatures of 94°C-55°C-72°C that we aimed for. So, we altered our protocol (Figs. 3-4).
Do you remember the overshoot of the measured temperature to above 100°C when we set the target temperature to 94°C for the denaturation step? (Fig. 2) To avoid this, we set the maximum target temperature to 90°C and programmed the air fryer to start ’cooling down’ to 40°C once the probe inside hit 85°C (steps 4-5, Fig. 3). This was to avoid any overheating that would denature enzymes and be a death sentence to any PCR. Our alternated protocol resulted in a consistent heating up to 94-98°C, forming the sweet spot for the denaturation.
Fine tweaking
To tackle the second challenge and achieve the temperature of the annealing step, we took advantage of an observation we made while tinkering with the cycles (Fig 2). Apparently, heating up is not an instant process, as the temperature continues to drop for a couple of seconds before eventually rising. Exploiting this delay, we changed the air fryer’s target temperature to 40°C from 60°C, once the probe inside measured 60°C (step 2, Fig. 3). Before the air fryer started to heat up, the trailing cooldown resulted in the decline of the measured temperature to around 55-59°C, the temperature for primer annealing in the PCR. The result here was that we managed to measure 60°C, when we set the target temperature to 40°C.
Finally, for the elongation step, we once again relied on this heat transfer lag. We set the target temperature to 60°C, causing the air fryer to overshoot the measured temperature to 70°C, and that’s when our cooling off to 40°C kicked in (step 3, Fig. 3). However, much like the annealing step, the increase in trailing temperature here was enough to measure 70-73°C inside the air fryer for the duration needed for elongation. Then we combined the elongation with all the above steps and repeated them. That was it. We had achieved cycling of the 3 steps of PCR with accurate temperatures consistently, albeit with a precision window of a few degrees Celsius (Fig. 4).
A job well done?
Although there was room to improve thermal precision in our system, our observations were encouraging and demonstrated that achieving PCR in an air fryer is within reach. Altogether, we realized that a smart air fryer alone was not sufficient to run a PCR; however, complementing it with a smart home thermometer unlocked the potential of smart appliances, further blurring the lines between molecular biology instruments and smart home technology. The natural next step for us was to test primers with annealing temperatures within our achievable range, targeting a known positive control to validate amplification. What other optimizations could push our air fryer-home thermometer setup closer to a reliable, precise PCR platform? Which primers and positive samples should we try? Stay tuned for the next chapter of our air fryer PCR journey.
No comments yet